
Share this
by Lauren Ryan on October 2023
The primary function of marketing is to develop and nurture a relationship with customers & potential customers. While many marketers are experts at building relationships personally and in the workplace, we often forget those skills when tasked with creating a relationship with an ambiguous target audience. How do we make that task more manageable? We try putting a face to the name with complex personas. We design the ideal pathway for those personas to do business with us. And, in this process, we either lose the human element entirely or give up. Or both!
This article will discuss how to start nurturing inbound leads in HubSpot. You will get ten different answers if you ask ten different agencies how to accomplish this. There is no perfectly correct answer. You will need to try several approaches and see which works best for your audience. But, like most marketers, you must pick a direction and get started. No more thinking; it’s time to just try something. So, here’s how to get started with lead nurturing in HubSpot following the inbound methodology.
How to Start with Inbound Lead Nurturing in HubSpot
All inbound strategies start with a content offer. Yes, there’s an argument around gated versus ungated content. And you shouldn’t require an email address for every piece of content you create. But you absolutely should have something on your website that requires an email address to access.
To have leads to nurture, you need to provide a lead magnet. As the word implies, a lead magnet attracts leads. Many companies fail at inbound marketing and resort to less appealing methods like purchasing lists, sponsoring tradeshows for access to attendee data, or direct mail. This spray-and-pray approach to marketing works for some companies. But, if you’re a marketer who would like to have a proven process for lead generation and nurturing founded on trust and not dumb luck, it’s worth the time and investment to get good at inbound marketing.
Inbound marketing isn’t easy, and you won’t be an overnight success. That’s why HubSpot is a powerful partner in developing an inbound strategy. You can define your approach, publish your content, and implement automation to execute your plan. Then, using HubSpot analytics and reporting, you can monitor and optimize your campaigns until they are successful.
How to Create an Inbound Lead Magnet
Creating an inbound lead magnet is as complicated as you make it. An inbound lead magnet is something that your audience cares enough about to agree to receive marketing emails from you to get access. Our email inbox is a highly protected space in today's digital landscape. If marketers want access to our email addresses, they need to earn it.
When creating your lead magnet, focus solely on the value your content gives the reader. Lead magnets should not focus on your product, company, or offer. They are not about what you want your leads to know but about what they asked to learn about. If you need help building a content strategy, check out They Ask, You Answer by Marcus Sheridan. It will change your marketing strategy forever.
How to Create a Lead Magnet
If you do not currently have a piece of content that will work as a lead magnet, here’s how to create one.
- Pick the topic. Don’t think too hard on this one. Talk to people in a customer-facing role at your organization. Build a list of the top questions customers ask them. Pick the top question that’s asked and get started.
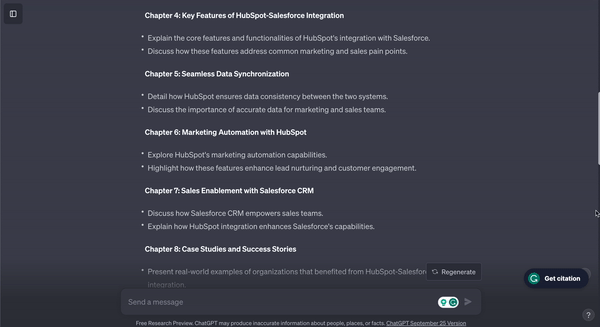
- Create a content outline. AI is all the rage. If you want to start integrating AI into your marketing execution, this is a great place to start. Ask ChatGPT to create the outline for your ebook or guide. ChatGPT helps you produce this content faster by beating blank page syndrome. And this method doesn’t put you at risk of creating poor content by using AI. You’re using AI to get you started, not to do your job for you. Here’s a look at how to create this prompt in ChatGPT for free.
- Finish creating the guide. Take the outline and run with it. Write like a human and answer the question thoroughly in your unique brand voice. Do not use this as an opportunity to promote your product or brand. Your goal here is to educate the reader.
- Publish the guide. Once you have a PDF ready for print, create a landing page in HubSpot. Add a form and a compelling story about why the reader should provide their information in exchange for your content. Here’s an example of how we did this with our Hubspot Salesforce integration guide.
Key Elements to Create in HubSpot to Support Your Lead Magnet
Now that your lead magnet is live and ready to collect leads, it’s time to prepare HubSpot to receive the data. Here are the steps to take in HubSpot before promoting your landing page:
- Create a Campaign. HubSpot Campaigns allow you to track the overall performance of a group of marketing assets focused on one goal.
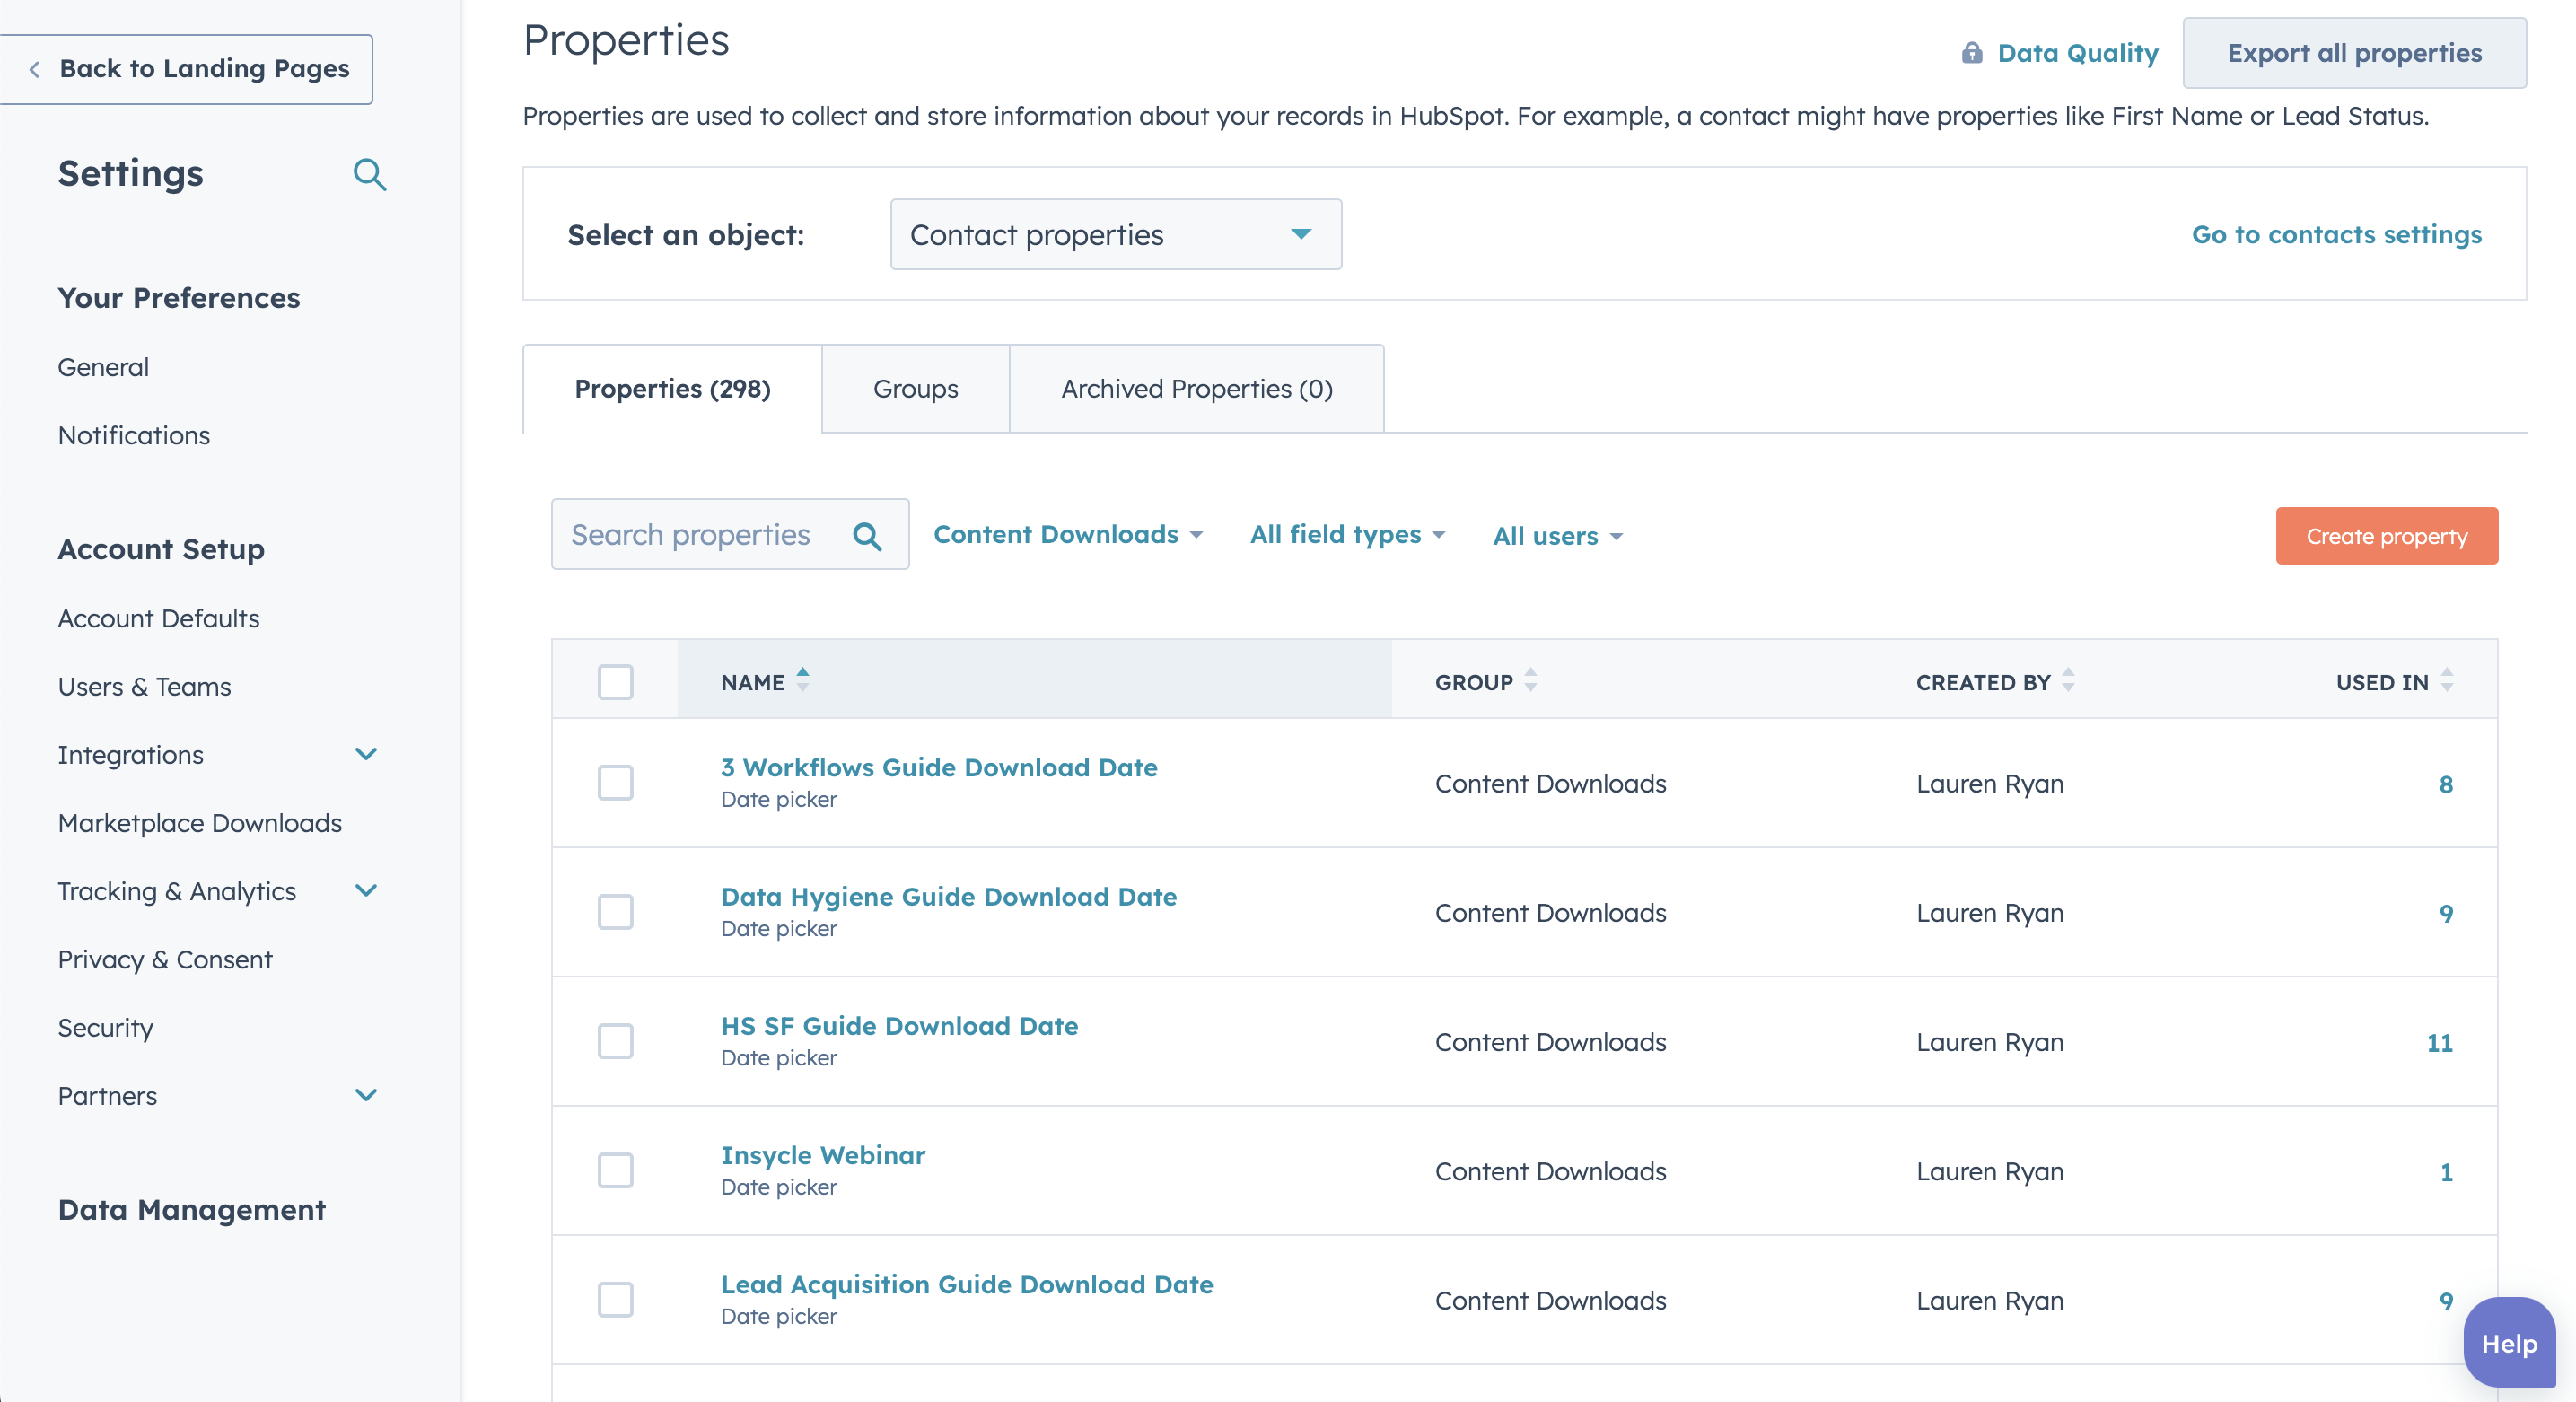
- Create a date property in HubSpot. Use this property to track when a person downloaded this guide. This property will become key to your overall nurture strategy for inbound leads. To keep your data organized, create a new property group in HubSpot specifically for your guide download data. This lead magnet may be your first, but it will not be your last.
- Create a confirmation email. Send Contacts an email and deliver the lead magnet to their inbox. Save this email as an automated email and use it in the form submission Workflow.
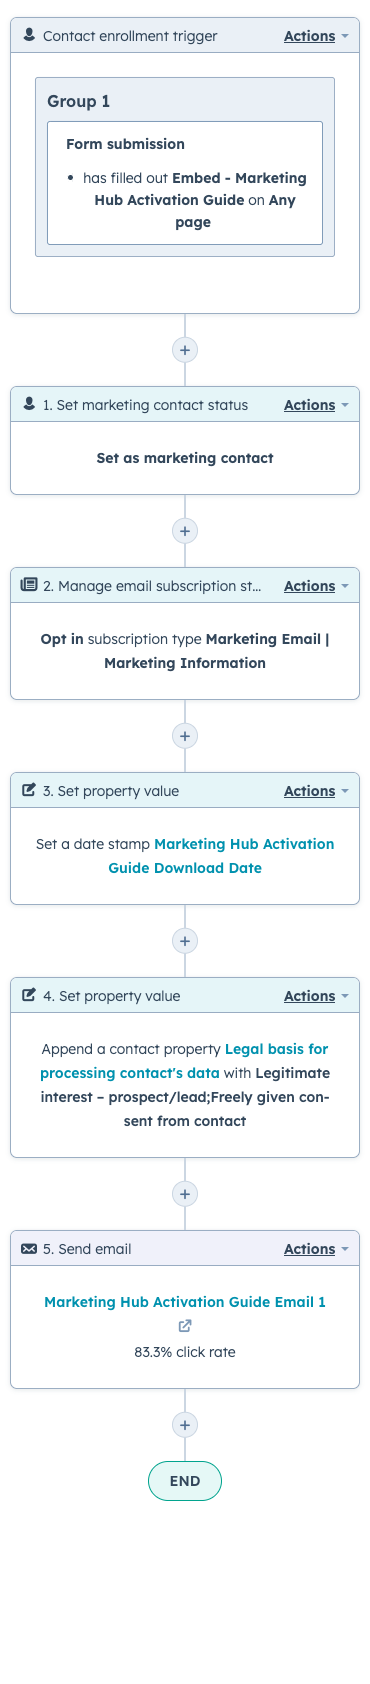
- Create a form submission Workflow. Use a contact-based Workflow that enrolls people when they submit the form to download your lead magnet. Here are the actions to include in your Workflow:
- Set marketing contact status. This adds the contact as a marketing contact and ensures you can send them a marketing email.
- Manage email subscription status. Opt the contact into the relevant email subscription to receive your confirmation email.
- Set a property value. Set legal basis for processing the contact’s data. This is a fail-safe to ensure you store GDPR data before emailing.
- Set a property value. Set the date stamp for the property you created to indicate this guide was downloaded. Choose “date of step” when setting the date property.
- Send email. Send the marketing email you created to deliver the lead magnet to people who have downloaded it.
How to Structure a Nurture Workflow in HubSpot
Now that you have a lead magnet, it’s time to develop a way to nurture leads once they’re in your database. One strong piece of content will get leads in the door, but it likely isn’t enough to secure a meeting.
Create Content for a Nurture Workflow in HubSpot
We’re keeping it simple as you’re just getting started with lead nurturing. Knowing this part can get very complex, let’s take the most straightforward next step. Create a list of topics that interest the person who downloaded your lead magnet. For example, let’s say you created a lead magnet explaining how to create a peanut butter and jelly sandwich. Presumably, readers may also be interested in how to make a peanut butter and banana sandwich, five quick lunch ideas for busy parents, and no-cooking required snack ideas.
Using this list of topics, create a series of emails to share information on related topics and recapture the reader's interest. As a reminder, this nurturing phase is focused solely on building a relationship. This goal isn’t to promote your company or make a hard sell. These emails should link back to a blog post or lead magnet on your website.
Build a Nurture Workflow in HubSpot
As your content strategy matures, you will likely have several nurture Workflows in HubSpot. Pick one overarching topic your audience has expressed interest in for each nurture Workflow. HubSpot refers to these as topic clusters.
Follow these steps to create this nurture Workflow in HubSpot:
- Create a contact-based Workflow. Enroll contacts when the lead magnet download date is known. This criteria will enroll them after they have completed the confirmation Workflow you created. If you create other lead magnets that would qualify for this nurture Workflow, add OR criteria for enrollment and include that guide download date as well.
- Add a delay. Even though leads will enroll right away, you don’t want to send them additional information immediately. Test different lengths to find the right waiting period for your audience. If you don’t know where to start, start with 1-2 days.
- Add an if/then branch. Check if the recipient has engaged with the first piece of content you will send them. For example, if you send them to a blog, filter to see if they have looked at this blog before sending it to them again.
- Send email. If they haven’t looked at this content before, send them the email you created promoting it.
- Go to action. If they have looked at that content before, send them to the next if/then branch and skip the email. Unless you have a good reason for them to view content more than once, it’s best to keep introducing them to new content using this Workflow.
- Repeat steps 3-5 until you run out of content.
In conclusion, nurturing inbound leads in HubSpot is crucial to successful marketing. By creating a valuable lead magnet and implementing a comprehensive nurture workflow, marketers can build relationships with their audience and provide them with relevant and engaging content. HubSpot offers a powerful platform to track and optimize campaigns, ensuring that marketers can continuously improve their lead-nurturing strategies. While the process may take time and effort, the results are worth it, as it enables companies to generate leads founded on trust and not luck. So, if you're ready to take your marketing to the next level, start implementing these strategies in HubSpot and see the positive impact on your business.
Want to make sure you're following best practices in HubSpot? Download this guide to see the 5 key indicators of success for Marketing Hub users AND learn how to achieve them.