
Share this
by Sawyer Klein on April 2022
In Salesforce, Lead Stage and Lead Status represent two distinct ways to track your lead's progression through the buyer's journey.
What's the Difference Between Lead Stage and Lead Status?
Lead Stage is used to indicate where a person is in the buyer journey.
If you've integrated HubSpot and Salesforce, you may have noticed that Salesforce Lead Stages are similar to HubSpot Lifecycle Stages.
For reference, the standard HubSpot Lifecycle Stages include:
- Subscriber – A contact who has opted to receive updates from you
- A lead – A contact who has taken a conversion action and demonstrated interest beyond a subscription sign-up
- Marketing Qualified Lead (MQL) – A contact your marketing team has identified as ready to move into the sales funnel
- Opportunity – A contact is associated with a deal
- Sales Qualified Lead (SQL) – A contact your sales team has identified as a potential customer
- Customer – A contact who’s made at least one purchase
These stages represent where the lead is in your buyer's journey and help you determine, at a high level, what activity comes next for that prospect. For example, a marketing qualified lead may be enrolled in an automation that assigns a sales owner and creates a task for the sales team to follow up with the MQL to qualify them for fit and interest.
But, the Lead Stage alone does not supply all of the information needed to fully assess a prospect's status with your organization. Once the Lead Stage reaches Marketing Qualified Lead, the Lead Status field comes into play.
Lead Status indicates a lead’s progression from an MQL to a customer and is directly related to your sales team's interactions with the leads.
Understanding Salesforce Lead Status
Once a lead reaches the MQL Lead Stage, the sales team begins their outreach. This field is usually used to indicate if they've attempted to contact the lead, if they've qualified the lead for an opportunity, or if they've determined a lead is unqualified.
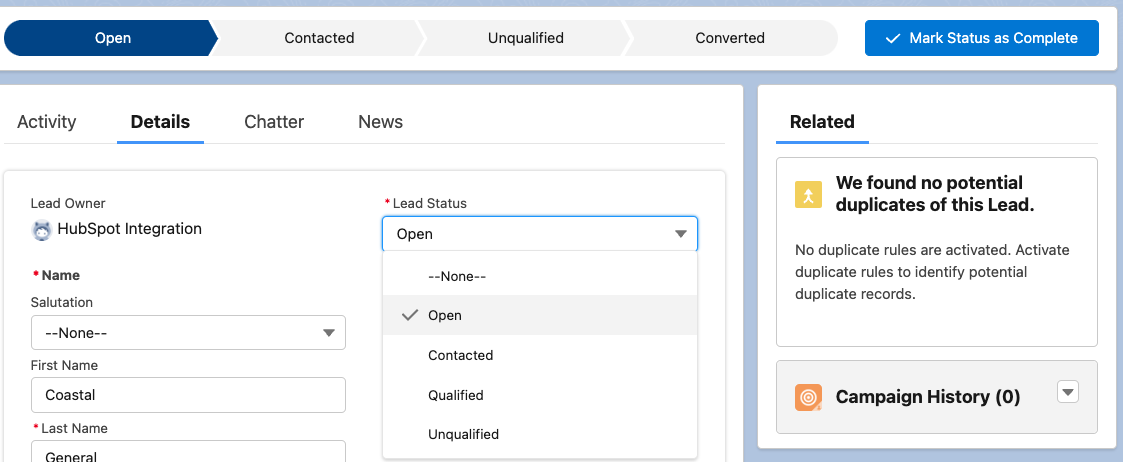
In Salesforce, the default Lead Status options include:
- Open - Indicates that the lead has been assigned to sales.
- Contacted - Indicates that sales has started outreach with the lead.
- Qualified - A lead sales has connected with and confirmed interest in moving forward in the buying process.
- Unqualified - An unqualified lead is one who will never buy from your organization because they don’t line up with your ideal buyer criteria. Common reasons for lead disqualification include: Not Ready, Not a Fit, Not Interested, and Invalid Data.
Pro-Tip: Adding an additional picklist field to track these unqualified reasons gives your marketing team the insights they need to develop better re-engagement campaigns. You can create a Salesforce Validation Rule or use a Field Dependency to require that an "Unqualified Reason" is set when the Lead Status is changed to "Unqualified" to enhance your reporting and reactivation marketing efforts.
While these are the default options in Salesforce, it’s important to identify which status options work best for your team. If the default Lead Status options do not work, you can customize them for your business. For instance, you can use the following Lead Status categories to add more clarity for your sales team: New, Contacted, Working, Qualified, and Unqualified.
Create and Edit Lead Status in Salesforce
Now that we understand that the Lead Status represents the sales team's interactions with your prospect, it's time to design your Lead Status options in Salesforce. To set the Lead Status you'll use a Salesforce Lead Process. The Salesforce Lead Process can differ by Lead Record Type—just like Salesforce Opportunities and Sales Processes. The status options you define in this process will define the progress bar at the top of your lead records.

Create a Salesforce Lead Process
- Navigate to Setup and search for "Lead Processes" in the Quick Find search bar
- Click "New" next to Lead Processes
- Input a name for your Lead Process and click "Save"
- Select from the available options to define your Lead Process
- To add an additional or change an existing option, navigate to Object Manager > Lead > Fields & Relationships > Lead Status. Here you can create a new picklist value or edit an existing picklist value.
- Click "Save"
Now, you can see your Lead Status options in the Lead Status field and the progress bar on Lead records in Salesforce.
Create a Lead Stage Field in Salesforce
Once you've defined your Lead Status options in Salesforce, create a Lead Stage picklist to track the prospect's lifecycle.
- Navigate to Setup > Object Manager > Lead > Fields & Relationships > New
- Select a Picklist from the field type options
- Label the field "Lead Stage" and enter the following values
- Lead
- Marketing Qualified Lead
- Sales Qualified Lead
- Opportunity
- Customer
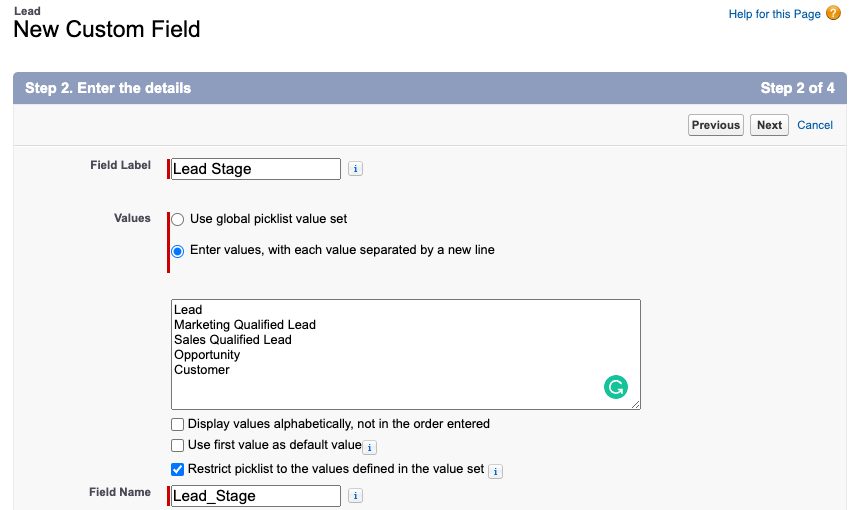
- Click "Next" twice and then click "Save"
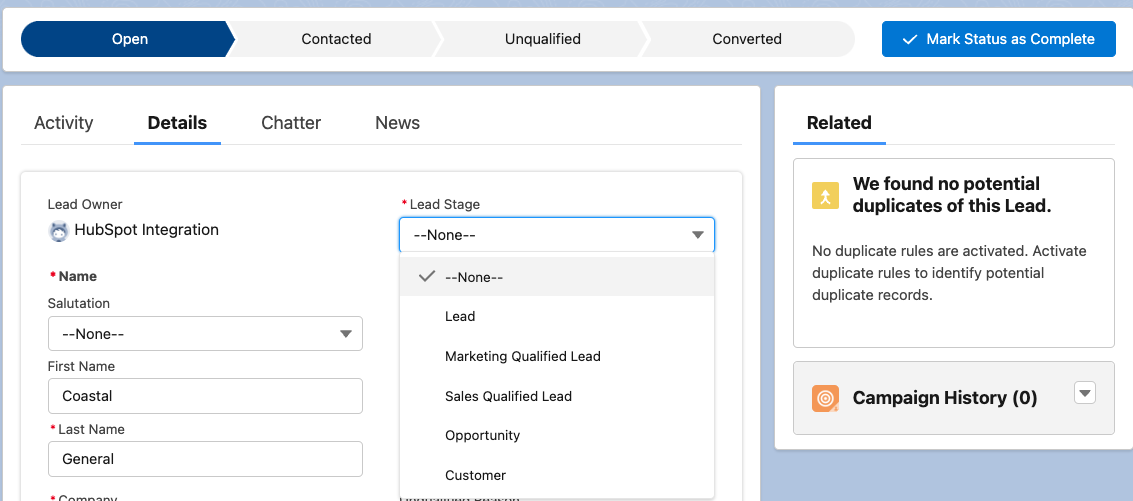
Now, you can see the Lead Stage field on your Lead records in Salesforce.
Automating Salesforce Lead Stage and Lead Status
Now that you've configured your Lead Stage and Lead Status in Salesforce, let's think about how to automate these fields.
Although your sales and marketing team can manage these manually, the goal should always be to automate processes where possible.
Here is the ideal framework for automating Lead Stage and Lead Status in Salesforce.
- When a Lead Is Created
- When importing leads to Salesforce or creating leads in your marketing automation platform (like HubSpot or Marketo), set the Lead Status to "New" or "Open" and the Lead Stage to "Lead."
- When a Lead is Marketing Qualified
- When the marketing team determines that a lead is sales-ready, the Lead Stage should be set to "Marketing Qualified Lead" either manually or via automation in your marketing automation platform.
- When a Lead is Sales Qualified
- When the sales team qualifies a lead as a good fit and determines they are interested in considering your products or services, create an automation to update Lead Stage to Sales Qualified Lead when Lead Status is set to "Qualified" or vice versa.
- When a Lead becomes an Opportunity
- In most Salesforce accounts, a Sales Qualified Lead is converted to a Contact, Opportunity, and Account before continuing. But, if your organization only uses the Lead Object, create an automation to set the Lead Stage to "Opportunity" when an opportunity is created.
- When a Lead becomes a Customer
- While most organizations manage customers using the Contact object, it's common that leads (working at existing customer accounts) will enter Salesforce or your marketing automation platform after submitting a form. To automate this effectively, create an automation to set the Lead Stage to "Customer" when a lead is created and associated with an existing customer account.
Designing a Revenue Operations Framework
Now that we've established the basics of Lead Stage and Lead Status, it's time to implement them for your team. Lead Stage and Lead Status play a huge role in your overall Revenue Operations strategy as an organization. While the setup process may seem simple, the impact of managing the lead lifecycle process poorly can be detrimental.
Ready to dive deeper? Download our free Revenue Operations Guide to learn how to implement the Revenue Operations Framework at your organization.
Download the Revenue Operations Guide