
Share this
by Lauren Ryan on July 2021
It's no secret that the contact model differs between Salesforce and HubSpot. But, to get access to the best CRM and best marketing automation platform, you need to master the HubSpot Salesforce integration, quirks included.
“Lifecycle stages are a HubSpot thing. We don't need that because we have Salesforce.” - many newbies to the HubSpot Salesforce integration
If you choose not to strategically use the HubSpot lifecycle stages, HubSpot still populates a value for this property. HubSpot automatically maintains certain lifecycle stages based on the progression of the contact through the funnel. When used properly, the lifecycle stage property provides an excellent basis for funnel conversion reporting. Plus, you can now create custom lifecycle stages in HubSpot.
.png?width=618&name=HubSpot%20Lifecycle%20Stages%20Explained%20(1).png)
Lifecycle Stages Automatically Updated in HubSpot
Subscriber | When a new contact subscribes to your blog or newsletter
Lead | When a contact converts on a website form (other than blog or newsletter)
Opportunity | When a contact is associated with a deal (or opportunity in Salesforce)
Customer | When a contact is associated with at least one closed won deal
Sync Lifecycle Stages with Salesforce
The lifecycle stage property is not meant to replace the lead status field. Salesforce uses objects to show contact progression. When a prospect has not yet converted, they are created as a lead in Salesforce and measured with the lead status field. When they are ready for an opportunity to be created, the lead is converted, and an opportunity, account, and contact are created.
HubSpot does not differentiate between leads and contacts in separate objects. Instead, they manage this conversion using the lifecycle stage property. As a lead moves from a subscriber to a marketing qualified lead (MQL) and beyond. They remain a contact but advance their lifecycle stage.
Rather than forcing a fit between lead status in Salesforce and lifecycle stage in HubSpot, it's best to separate them and sync both fields between Salesforce and HubSpot.
To do this, create a picklist field in Salesforce on the Contact and Lead object for Lifecycle Stage using the default values on the HubSpot property and add this field to the integration. Then, create a dropdown select property in HubSpot using the values for the Lead Status picklist in Salesforce and add this field to the integration with a two-way sync.
Keeping Lifecycle Stages in Sync
Once the lifecycle stage property is added to the HubSpot Salesforce integration, configure the settings to adjust the lifecycle stage and build workflows to maintain the lifecycle stage.
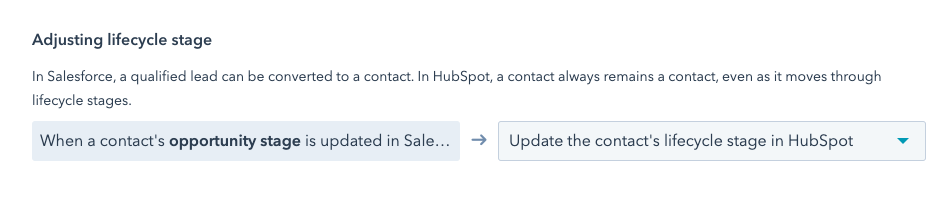
To adjust the lifecycle stage automatically based on Salesforce opportunity stages, navigate to the integration page in HubSpot. Under the Salesforce > HubSpot section, set the Adjusting lifecycle stage option to 'Update the contact's lifecycle stage in HubSpot'.
After you've adjusted the setting, build a few contact-based workflows to maintain earlier-stage lifecycle stages. Here are a few ideas to get you started.
- Salesforce Lead
- Enrollment: Salesforce Lead ID = Known AND Salesforce Contact ID = Unknown
- Action: Set Lifecycle Stage = Lead
- Marketing Qualified Lead
- Enrollment: HubSpot Score = 25+ (If you have not implemented lead scoring, learn more about setting that up here)
- Actions:
- Set Lifecycle Stage = Marketing Qualified Lead
- Assign contact to the appropriate sales owner
- Create a task for the sales owner to qualify
- Sales Qualified Lead
- Enrollment: Salesforce Lead Status = Qualified
- Action: Set Lifecycle Stage = Sales Qualified Lead
- Other
- Enrollment: Salesforce Lead Status = Unqualified OR Associated Deal = Closed Lost
- Action: Set Lifecycle Stage = Other
Start Using HubSpot Lifecycle Stages
Many Salesforce customers discover that the native reporting enabled by using HubSpot lifecycle stages is a game-changer for reporting on marketing, sales, and opportunity conversion rates. Additionally, lifecycle stage changes in HubSpot automatically populate a HubSpot date property that shows the date of the change. This makes it easy to see what piece of content leads to conversion and how quickly leads convert between stages.
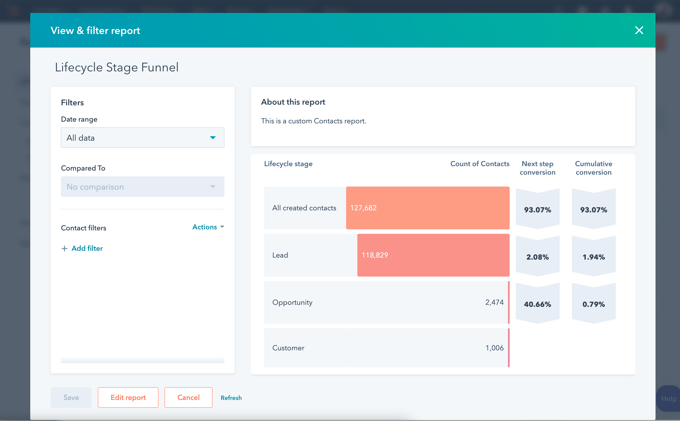
After you implement lifecycle stages in the HubSpot Salesforce integration, build a funnel report to monitor conversion. You can do this by navigating to Reports > Reports > Create Custom Report > Funnels > Contacts. Select the lifecycle stages you're using to show conversion rates and add the report to your performance dashboard. The visibility this provides is invaluable!
Want to learn more about the HubSpot Salesforce integration?
We've created the first-ever course designed to help you master the HubSpot Salesforce integration. If you're ready to build the strategic & technical skills needed to maximize your tools, get started with the course for free!